
Aseptic port access
Eight steps, on one chart, sized for the wall of a procedure room. Free, and we will post you a printed one.
Most port failures that get blamed on the device are access failures. Contamination at the septum, a coring needle, a port locked with blood in it. The technique is not complicated, but it has to be the same every time and by every person, and that is what a chart on the wall is for.
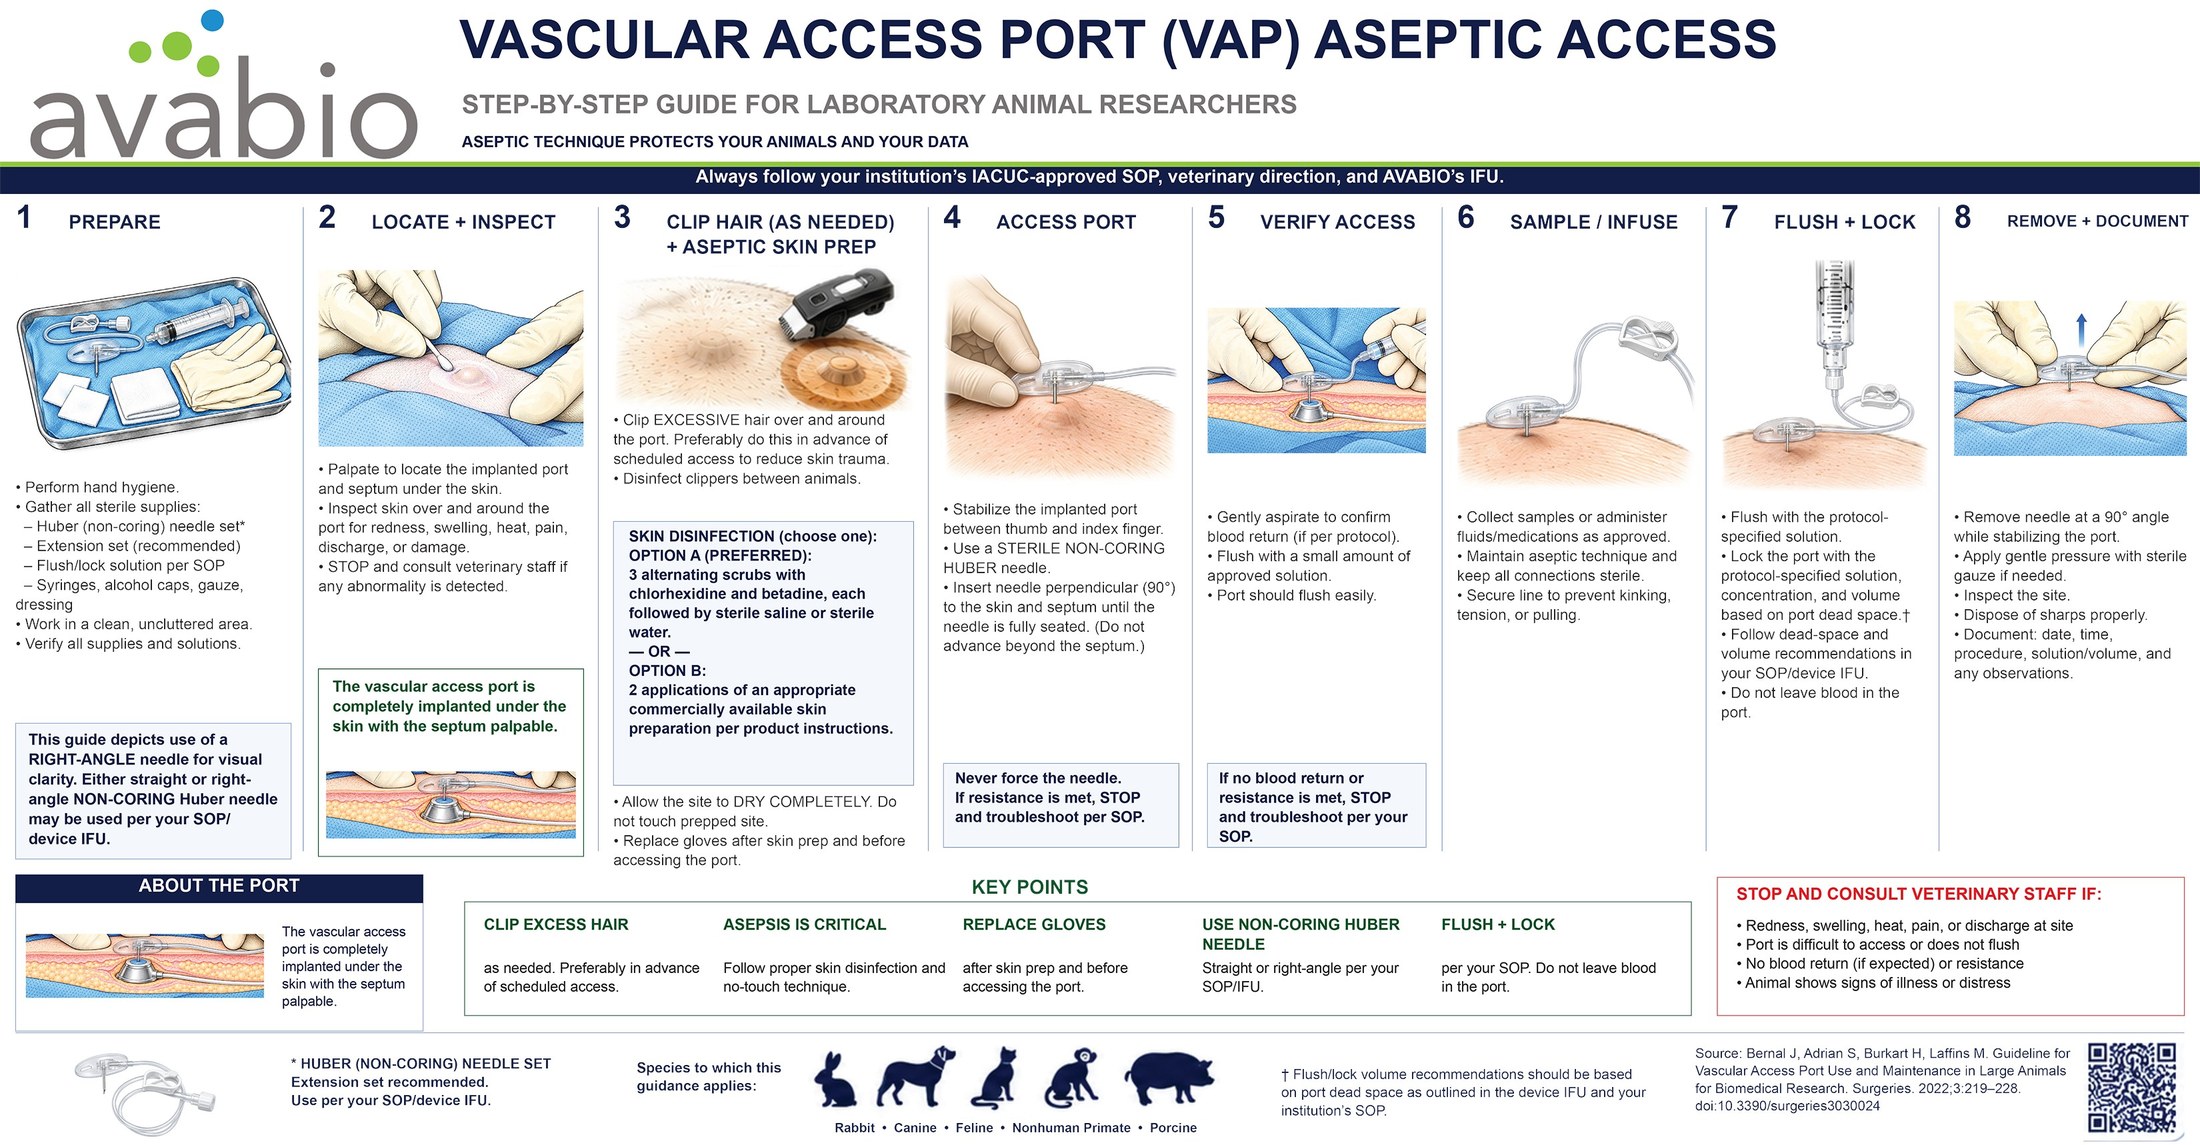
Full size as a PDF, set up to print at 11 by 5.7 inches, so it runs on a standard tabloid sheet. Applies to rabbit, canine, feline, non-human primate and porcine models.
The eight steps
Always follow your institution's IACUC-approved SOP, your veterinary direction, and the device IFU. Where those differ from this chart, they win.
1Prepare
- Perform hand hygiene.
- Gather all sterile supplies: Huber non-coring needle set, extension set, flush and lock solution per SOP, syringes, alcohol caps, gauze, dressing.
- Work in a clean, uncluttered area.
- Verify all supplies and solutions.
2Locate and inspect
- Palpate to locate the implanted port and septum under the skin.
- Inspect the skin over and around the port for redness, swelling, heat, pain, discharge or damage.
- Stop and consult veterinary staff if any abnormality is detected.
3Clip and prep
- Clip excessive hair over and around the port, preferably in advance of scheduled access to reduce skin trauma.
- Disinfect clippers between animals.
- Either three alternating scrubs with chlorhexidine and betadine, each followed by sterile saline or sterile water, or two applications of an appropriate commercial skin preparation per product instructions.
- Allow the site to dry completely. Do not touch the prepped site.
- Replace gloves after skin prep and before accessing the port.
4Access the port
- Stabilize the implanted port between thumb and index finger.
- Use a sterile non-coring Huber needle.
- Insert the needle perpendicular to the skin and septum until it is fully seated. Do not advance beyond the septum.
- Never force the needle. If resistance is met, stop and troubleshoot per SOP.
5Verify access
- Gently aspirate to confirm blood return, if per protocol.
- Flush with a small amount of approved solution. The port should flush easily.
- If no blood return or resistance is met, stop and troubleshoot per your SOP.
6Sample or infuse
- Collect samples or administer fluids and medications as approved.
- Maintain aseptic technique and keep all connections sterile.
- Secure the line to prevent kinking, tension or pulling.
7Flush and lock
- Flush with the protocol-specified solution.
- Lock the port with the protocol-specified solution, concentration and volume, based on port dead space.
- Follow the dead-space and volume recommendations in your SOP and the device IFU.
- Do not leave blood in the port.
8Remove and document
- Remove the needle at a 90 degree angle while stabilizing the port.
- Apply gentle pressure with sterile gauze if needed.
- Inspect the site. Dispose of sharps properly.
- Document date, time, procedure, solution and volume, and any observations.
The five that matter most
- Clip excess hair as needed, preferably in advance of scheduled access
- Asepsis is critical. Proper skin disinfection and no-touch technique
- Replace gloves after skin prep and before accessing the port
- Use a non-coring Huber needle, straight or right-angle, per your SOP and the IFU
- Flush and lock per your SOP. Do not leave blood in the port
Stop and consult veterinary staff if
- There is redness, swelling, heat, pain or discharge at the site
- The port is difficult to access or does not flush
- There is no blood return where one is expected, or there is resistance
- The animal shows signs of illness or distress
The chart depicts a right-angle needle for visual clarity. Either a straight or a right-angle non-coring Huber needle may be used per your SOP and the device IFU. Flush and lock volumes should be based on port dead space as set out in the device IFU and your institution's SOP.
Source: Bernal J, Adrian S, Burkart H, Laffins M. Guideline for Vascular Access Port Use and Maintenance in Large Animals for Biomedical Research. Surgeries. 2022;3:219-228. doi:10.3390/surgeries3030024
Order a printed sticker
Laminated, adhesive-backed, 11 by 5.7 inches, sized for a procedure-room wall or the side of a cabinet. No charge, and no obligation to be a customer. Tell us how many rooms you need to cover.
If the technique is the problem
A chart fixes the steps people forget. It does not fix a technique that was learned wrong, or a model that is losing animals for a reason nobody has identified yet. For that, we come out.